Table of Contents
Virtual Enter-Sensor using XML-scripts
Assignment
This example explains the use of virtual Enter sensors using XML-scripts.
Virtual Enter sensors can be used under certain conditions, in order to save physical (real) Enter sensors.
The following figure shows a track diagram of a shadow-station with two access routes:

The Enter sensors of Blocks 2-6 are here configured virtually.
A "real" (echter) sensor activates the appropriate virtual Enter sensor, depending on the by Rocrail selected route segment (Rocrail shows the route as locked).
Previously, you had to create an action for each possible route and activate it on the physical (real) Enter sensor.
In this case, there would be the 10 actions (5 routes for Block 1→ Block 2-6 and 5 routes for Block 7→ Block 2-6)
Another action is necessary to disable the virtual detector again.
(→ downloads see the example Demo2 in staging)
With the possibility of XML scripts only two actions are needed. One action triggers the XML script to set the virtual sensor. The second action triggers a script to disable the virtual sensor.
The advantage of the scripts is that these can be created much more quickly in a text editor, much easier as the many individual actions.
This is also easier to understand - only two actions are created instead of 11 as in the earlier example.
Script
Here is the the script for setting the sensor:
<xmlscript>
<!-- SET the virtual Enter sensor depending of the locked route -->

	<!-- Enter sensor for Block 2 -->
  <if state="st autogen-[1-]-[2+] = locked">
    <then>
	<fb id="2e" cmd="on"/>
	<exit/>
	</then>
  </if>
  <if state="st autogen-[7-]-[2+] = locked">
    <then>
	<fb id="2e" cmd="on"/>
	<exit/>
	</then>
  </if>

	<!-- Enter sensor for Block 3 -->
  <if state="st autogen-[1-]-[3+] = locked">
    <then>
	<fb id="3e" cmd="on"/>
	<exit/>
	</then>
  </if>
  <if state="st autogen-[7-]-[3+] = locked">
    <then>
	<fb id="3e" cmd="on"/>
	<exit/>
	</then>
  </if>

	<!-- Enter sensor for Block 4 -->
  <if state="st autogen-[1-]-[4+] = locked">
    <then>
	<fb id="4e" cmd="on"/>
	<exit/>
	</then>
  </if>
  <if state="st autogen-[7-]-[4+] = locked">
    <then>
	<fb id="4e" cmd="on"/>
	<exit/>
	</then>
  </if>

	<!-- Enter sensor for Block 5 -->
  <if state="st autogen-[1-]-[5+] = locked">
    <then>
	<fb id="5e" cmd="on"/>
	<exit/>
	</then>
  </if>
  <if state="st autogen-[7-]-[5+] = locked">
    <then>
	<fb id="5e" cmd="on"/>
	<exit/>
	</then>
  </if>

	<!-- Enter sensor for Block 6 -->
   <if state="st autogen-[1-]-[6+] = locked">
    <then>
	<fb id="6e" cmd="on"/>
	<exit/>
	</then>
  </if>
  <if state="st autogen-[7-]-[6+] = locked">
    <then>
	<fb id="6e" cmd="on"/>
	<exit/>
	</then>
  </if>

</xmlscript>
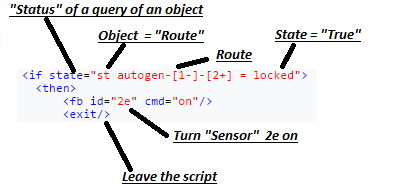
Script in detail:

After the first occurrence of "true", the script will exit, since no other route will be found.
Here the script to disable the virtual sensor:
<xmlscript>
<!-- Deactivate virtual Enter sensor -->

<fb id="2e" cmd="off"/>
<fb id="3e" cmd="off"/>
<fb id="4e" cmd="off"/>
<fb id="5e" cmd="off"/>
<fb id="6e" cmd="off"/>

</xmlscript>
Simply all sensors are disabled.
Alternate Script
Here is the the script with an "or" for setting the sensor:
<!– Enter sensor for Block 2 –>
      <!-- Either for Block 1 or for Block 7 the Route has been set-->
  <if state="st autogen-[1-]-[2+] = locked|st autogen-[7-]-[2+] = locked" alltrue="false">
     <then>
    <fb id="2e" cmd="on"/>
Configure in Rocrail
The two actions are configured as follows…


"Command", the path will be entered for the script. In this example, the scripts are stored in the Workspace.
…and set up on the real Enter Sensors:


The action "ActionOn" is triggered when the real detector is activated and starts the script "script_on.xml". The corresponding virtual sensor for the route is activated.
The action "ActionOff" is triggered when you disable the real sensor and starts the script "script_off.xml". All virtual sensors are disabled.
Download
Plan und scripte:
virtualfbscript.zip