Table of Contents
Installing Rocrail on Windows
Introduction
Rocrail is provided for Windows as a ZIP file with - among others - the following advantages:
- No installation1) in the classical sense - just unzip and start.
- Unpacking to (almost) any place on the computer.
- No active2) Modification of the Windows registry - safe trial and error and trackless deletion possible.
- All files in one place.
- Installation on a suitable USB stick or portable drive. This allows convenient editing at the workplace and system operation at a remote location (e.g. basement, club home) without having to copy or synchronize files.
- Easy copying of the entire installation to a USB stick or other portable drive to take with you, e.g. to friends or a Rocrail meeting for presentation, discussion, analysis and getting help.
- Moving an installation to a new computer, to another drive etc. is easy and can be done with a few clicks.
Supported Windows versions
Rocrail runs on Windows versions starting with Windows XP.
- Windows XP, Vista are no longer supported in the forum! Installation may be possible, however, it is not recommended to use these versions.
- Windows 7, 8, 8.1 are limited supported3).
- Windows 10.
- Windows 11.
The following chapters refer to the current Windows 10 and 11.
General
The following two points must be observed:
- Special characters, such as umlauts, should generally be avoided. This is valid for Windows user names, folder names of the Rocrail installation and superordinate folders, as well as file names of e.g. locomotive pictures etc.
If the Windows user name contains umlauts, the correct installation may fail!
By removing the checkmark for UTF-8 in the Rocrail Settings General and the Rocview Settings General special characters are partly supported under Windows4).
- If third party anti-virus, anti-malware or firewall programs are used, it is entirely the user's responsibility to configure them in such a way that they do not hinder the proper installation and functioning of Rocrail and its components!
In case of doubt, such programmes are to be deactivated.
As of Windows 10, such additional programmes are generally considered unnecessary in a private environment.
1. Installation
This chapter describes how to download and install Rocrail for the first time.
If switching from an existing old installation created with setup.exe to the ZIP installer, there is a separate guide available, see Change to ZIP installer under Windows
1.1 Download
The daily updated ZIP file can be downloaded from the Rocrail Daily Builds page.
On the left side below Rocrail ZIP click on either Rocrail-WIN64.zip (for a 64bit system) or Rocrail-WIN32.zip (for an older 32bit system).
Depending on the browser used, a left click will either save the file in a central download directory or open a dialogue box to specify the desired location. Alternatively, by right-clicking and selecting Save target as… any desired location can be specified. Remember or write down the storage location.
1.2 Installing
1.2.1 Preparing the unpacking
Locate the downloaded ZIP file in the file system at the previously noted location - here it was saved on the desktop.
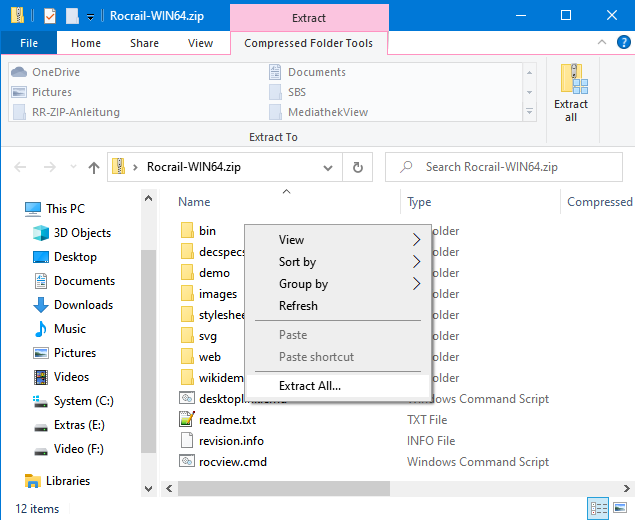
Open the context menu of the file (right click on the file) and select the item Extract All….
Note: The following steps are described using the unpacker included in Windows. If third-party software for unpacking has been installed, it is the user's responsibility to perform equivalent operations with that software.
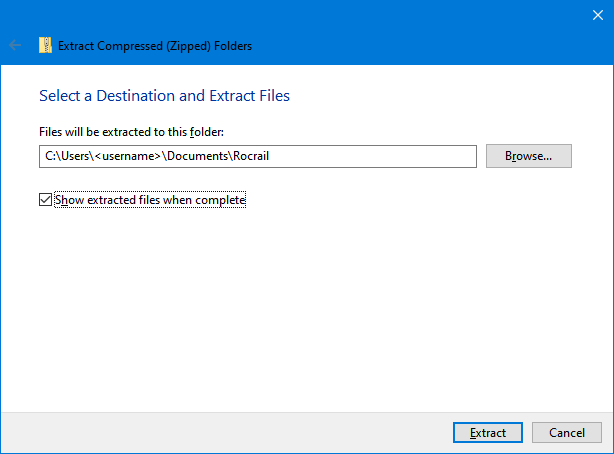
The following dialogue opens:
This dialogue shows the current location of the file in the field below Files will be extracted to this folder:.
1.2.2 Creating the Rocrail folder
Check the box next to Show extracted files when complete if this option is not already checked.
Instead of the displayed folder the folder where Rocrail should be installed has to be selected. First click on the button Browse….
| Important: |
|---|
| The folder can be created (almost) anywhere on the PC. However, it must not be created in protected areas of Windows! This includes the Program Files folder and the system folders of Windows. |
It is recommended to create the folder Rocrail in C:\Users\<Username>\Documents5). |
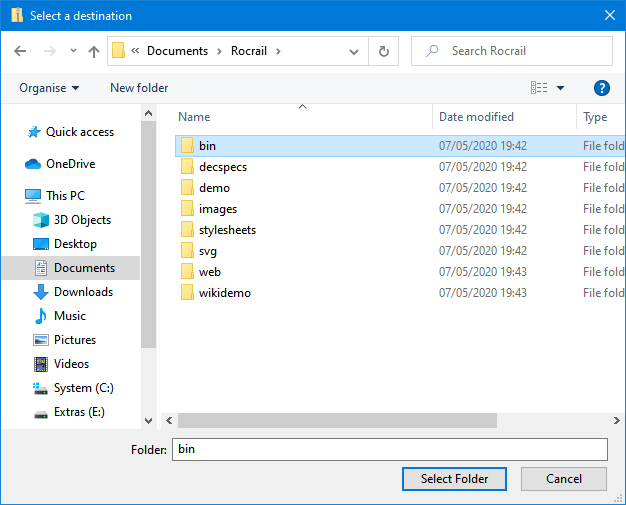
After clicking on Browse… Windows opens the dialogue Select a destination:
As shown in the figure, the Documents folder should now be opened. Then a new folder is created by clicking on the button New Folder. It should be named Rocrail. Finally the folder is set as destination by clicking on the button Select folder.
Windows will then return to the Extract Compressed (Zipped) Folders dialogue, which should now look like shown in the following section.
1.2.3 Unpacking
 |
Dialogue Extract Compressed (Zipped) Folders with destination folder C:\Users\<Username>\Documents\Rocrail |
Click on Extract.
The files are now extracted. This process may take a while, depending on the operating system settings, Windows Defender and computer performance. In the meantime, Windows will show the progress:
When the extraction is complete, Windows displays the contents of the newly created folder as the result:
 |
| Typical result after extraction. The exact folder content may change from time to time as Rocrail evolves. |
This completes the installation as such. Finally, a shortcut has to be created on the desktop.
1.3 Creating a desktop shortcut
If the extraction of the files was done with the above settings, the folder Rocrail was opened automatically6):
A double click on the file desktoplink.cmd7) in this folder creates a valid shortcut Rocview on the desktop. Handle Windows Defender messages as described in in the following chapter.
| It is mandatory to start Rocrail using this shortcut! |
|---|
Note: If the desktop shortcut cannot be created on the system with this procedure, the shortcut created in theRocrailfolder with the nameRocview(indicated by the icon shown above) must be copied manually to the desktop.
Tip: The shortcut can be pinned to the taskbar or to "Start", for example, if required.
2. Windows Defender
When creating the shortcut, the first start of Rocview and the first start of the Rocrail server, warnings of the Windows Defender can be displayed. This also applies after updates. The warnings should be handled as follows:
 |  |
| Click on "More Information". The dialogue changes as shown on the right | In the second step, click on the button "Run anyway". |
3. Updating the Rocrail installation
| Important: To update a very old (older than approx. May 2020) installation that was created with a setup file (rocrail-xxx-win32.exe or rocrail-xxx-win64.exe), follow these instructions once: Change to ZIP Installer on Windows. |
Rocrail is constantly evolving and should always be kept up to date. For regular, for example monthly updates, complete updates are recommended, see the following section.
In some cases it is useful to follow the current development with more frequent updates, for example once or twice a week or even daily. Such updates can be limited to essential parts of the program, see section Quick update.
Note: Quit Rocrail completely before each update!
3.1. Complete update
- Download a current ZIP file (Chapter 1.1).
- Prepare unpacking (Section 1.2.1).
- Remove the checkmark at
Show extracted files when complete(optional). - Click on the Browse button.
Dialogue Select a destination opens:
In this dialogue the folder where Rocrail was installed has to be selected. Normally this is the folder Rocrail under Documents.
The folder is selected as shown in the figure and the Select Folder button is clicked.
- Continue with the Unpacking section.
After all files have been extracted, Windows will ask how to handle existing files:
In this dialogue, click on Replace the files in the destination.
The update is now complete.
3.2 Quick Update
- Download a current ZIP file (Chapter 1.1).
- Open the downloaded ZIP file by double-clicking it.
Prepare the bin folder for extraction by right clicking on it and selecting Extract All….
Attention: The right click must be done to the right of the textbin, not on the text and not on the folder symbol, otherwise a different context menu will be shown. The folder must not have been activated beforehand (e.g. by a left click), otherwise the context menu with Extract All… is not available either.
The dialogue Extract Compressed (Zipped) Folders opens.
- The check mark at
Show extracted files when completecan be removed (optional). - Click on the Browse button.
Find the folder Rocrail into which the installation has been unpacked (in the example of this page: C:\Users\<Username>\Documents\Rocrail). Open the folder with a double click. Mark the contained folder bin as shown in the following figure and click on the button Select folder.
Windows jumps back to the dialogue Extract Compressed (Zipped) Folders, in which C:\Users\<Username>\Documents\Rocrail\bin should now be displayed as the target.
- Click on the Extract button.
- Confirm overwriting existing files as described in the Complete Update section.
4. Moving an Installation
Rocrail ZIP installations can be moved easily by moving the folder where Rocrail has been unzipped to the desired location. In the example on this page Rocrail was unpacked into the folder Rocrail under Documents.
Tip: It is just as easy to copy a Rocrail ZIP installation e.g. to a mobile data medium (hard disk, USB stick, etc.) for backup or for use at another location.
Notes: It is essential that all files and data belonging to Rocrail are stored in the Rocrail folder. This applies for example to workspaces, loco pictures, self created SVG theme folders etc.
Subsequently inserted absolute paths8) (recognisable by the fact that they start with a drive letter, such asC:\Users\…) must usually be adjusted after moving/copying, as these references are lost / become invalid.
4.1 Moving to another location on the same computer
- Move the folder
RocrailfromDocumentsto the desired location on the computer, for example a second internal drive. - After moving, run the file
desktoplink.cmdagain.
Note: An existing shortcut on the desktop is updated by executingdesktoplink.cmdand is therefore valid. If the old shortcut was pinned to the taskbar and/or to "Start", these pinned shortcuts must be renewed, because they are not updated: Right-click on the pinned shortcuts and select Remove from taskbar or Remove from Start. Then, if necessary, pin the new desktop shortcut back to the taskbar and/or "Start".
4.2 Moving to another computer
Moving the ZIP installation to another computer is done in the same way as described above.
Note: However, a 64bit installation only runs on a 64bit machine! Rocrail 32bit can be used on both a 32bit and a 64bit machine.
When connecting hardware, e.g. command stations, it must be ensured that the connection settings (e.g. COM ports, IP addresses, etc.) are adapted to the new conditions. Adjustments may also be necessary within the command station or hardware in general, if for example the IP address of the Rocrail server has to be entered there.
Documents and open the folder RocrailRefer to this section: FAQ
images and not as an absolute path like E:\Rocrail\images


