Table of Contents
ESU ECoS and Märklin CS1(R)
ECoS Firmware
The firmware must be at least version 4.3.1.
No forum support for older versions.
Note: A factory reset of the ECoS might be necessary, if a previously working system "all at once" starts to slow down.
See this Forum-Thema (German).
Configuration CS1:
Märklin CS1 with the original Märklin software Last upgrade V2.04 in 2009 provided by Märklin works with RocRail if the the Controller field is "ecos" with the IP 192.168.1.117

As for the configuration of the CS1:
- IP-Address: 192.168.1.117
- Gateway: 192.168.1.1
- Network: 255.255.255.0
- DHCP Check Box is disabled
Setup
Check your setup to find out how the ECoS is configured in the your LAN.
If you have problems connecting to Rocrail, try to connect the ECoS to your Web Browser using section 8.6 of the ECoS handbook (2011).
The same IP address or hostname that was used connecting the ECoS to your Web Browser is the IP address or hostname you need to enter in Rocrail.
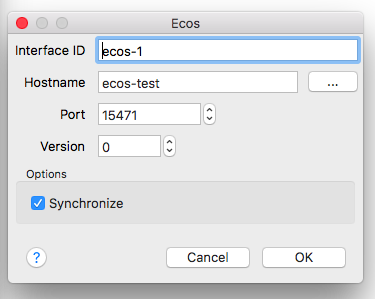
Hostname

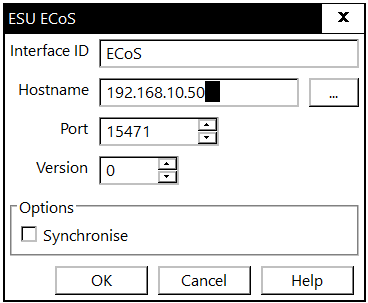
 Set the IP address or DNS name to match your ECoS. (Device name in the ECoS settings.)
As an example hostname 'ecos-test' is used.
Click the triple dot button ![]() on the right to open a web browser connection with the ECoS .
on the right to open a web browser connection with the ECoS .
- Note: Modern WEB Browser do no longer support Java Applets.
Use a VNC Client to access the ECoS remote.
Port
The default port for the ECoS is 15471.
Version
| Version | Function |
|---|---|
| 0 | RailCom messages with offset +1. |
| 2 | RailCom messages with the same offset, 1601, as occupancy. |
- Hint: It is normal that occupancy detectors and Railcom data come through different channels. After discovering the Railcom channel, create a normal feedback (sensor) with this address and enter it in the corresponding block with the "Ident" function.
Synchronise
Synchronise the loco definitions with the ECoS.
This option is also needed to add a new loco into the Ecos and register new locos found by Rocrail in the Ecos.
See also the Forum thread. (DE)
Note After the initial download of locomotive information using the synchronize function, it is recommmended to turn synchronize off (it uses quite a few resources). For the addition of a few locomotives the Discover feature can be used to add a locomotive to Rocrail on the fly. After adding a locomotive it is recommended to turn discover off.
Discover
| Rocview → Control → Discover |
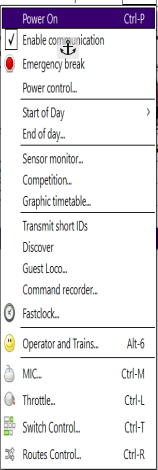
The Discover command can be used to get the locos from the ECoS.
Newly discovered locos during the session are automatically added to Rocrail.
The Discover option is a "flip" (on / off) command.
ECoS Throttle
To synchronize the ECoS throttle with Rocrail the Server option Allow Zero ThrottleID must be activated.
Command Station Variations
ESU ECoS 1/2
ECoS 1 (black & white screen) {model 50000- 4 Amp} with Railcom or ECoS 2 (color screen) {model 50200- 4 Amp or 50210- 6 Amp} with Railcom and RailcomPlus.
For the ECoS 1; Railcom and RailcomPlus is available in the power district of an ECoS Booster.

Märklin CS1 Reloaded
The Märklin CS1 (Reloaded) {model 60212} is technically the same as ECoS, except it does not support Railcom or RailcomPlus.
Railcom or RailcomPlus is available in the power district of an ECoS Booster.

Piko SmartBox
The Piko SmartBox is technically the same as ECoS but only supports the DCC format.
With the Smartbox you can use ESU Detectors, but the GUI is missing to configure them. Currently, you can not configure it through the network interface. You can try to program using an ECoS (or otherwise) and then attach them to a Smartbox, they should work.
See ESU Forum (in German): http://www.esu.eu/en/forum/forums-overview/topic/sonstige_produkte_support/ecos_detector_und_piko_smartbox/page/1/#pid151109

Setup connection and Command Station

The ECoS must be connected to the LAN as described in section 20 of the manual. The best way is to provide ECoS with a static IP address; section 20.1.2 of the manual.
In this example it is set to 192.168.10.50.
Remark: Sometimes the PC (Win XP, SP3) can't connect the CS1 (ping timeout) via network although the IP address and the wiring is correct. In that case you should start the PC before the CS1 boots.
Check if Rocrail PC can make a connection with ECoS: open the Web interface of the ECoS with an Internet browser http://192.168.10.50
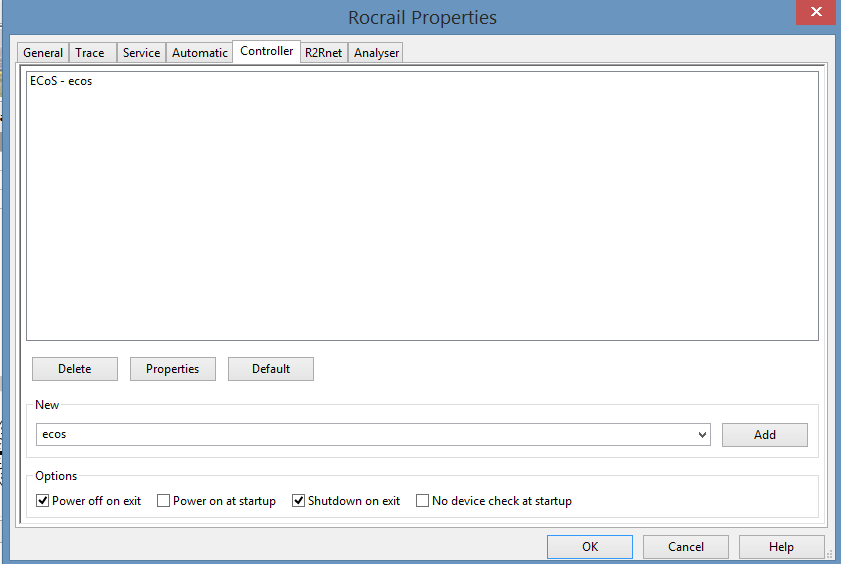
Now we can setup Rocrail. Start the Rocrail server and the Rocrail GUI. Choose File/Rocrail properties tab Controler and add a new controller from type "ecos". Fill in the IP address (the one in this example) and the port number 15471 (this is a fixed value). Remove the not used controllers, stop the GUI and server, and restart Rocrail server and GUI. (in this sequence)
Test the connection
With the Power On command we can test the communication. Select Control / Power On. The first time nothing happens because Rocrail is in Power Off and ECoS in GO (Power ON). Select it again. The ECoS should swap now to STOP mode. Repeat it and the ECoS swaps to GO and Rocrail shows Power On. If the settings for communicating with ECoS is correctly set then you can now start adding locomotives.
Locomotives
In the ECoS→Properties found in Controller set a check mark by "Synchronize", then locomotives contained in the ECoS are uploaded to Rocrail, locomotives not found in the Locomotive table of Rocrail are added. To keep these locomotives permanently in Rocrail, the check mark by "Generated" in the Locomotive table needs to be removed. MFX locomotives are added with the OID (object number in the ECoS) as the "fake" decoder address.
New Locomotive added to the ECoS, during the Rocrail session
As soon as a non-mfx locomotive is added to the ECoS, then this is immediately available for use in Rocrail.
When a new mfx locomotive is added to the ECoS, then a query against the Ecos Lok table is performed by the program. After this operation the new mfx locomotive is also immediately available for use in Rocrail.
Manually add a locomotive to Rocrail
Select Tables/Locomotives and create a new loco pushing the New button.

Note: The locomotive has to exist in the ECoS.
In this example the "V200".
In the tab "Interface" you have to set up the decoder address. Leave the Interface ID empty!
Note: The address is not important as the link is done by the ID, however, the address must not be 0 (zero).
Note: The protocol should remain to 'Default'. For Motorola decoders the protocol may be set to 'Motorola', mfx decoders, however, require 'Default'.
Loco Test
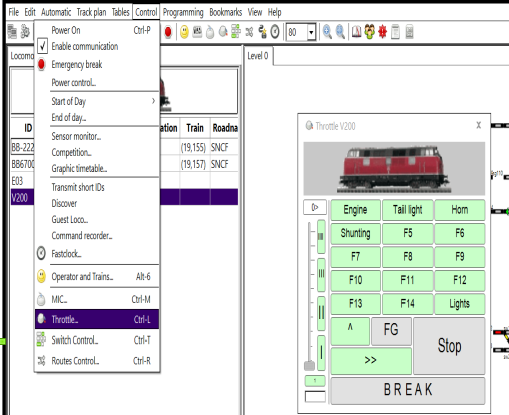
The first loco can now be tested. In order to do so for instance a throttle is opened and the loco is started.
Switches
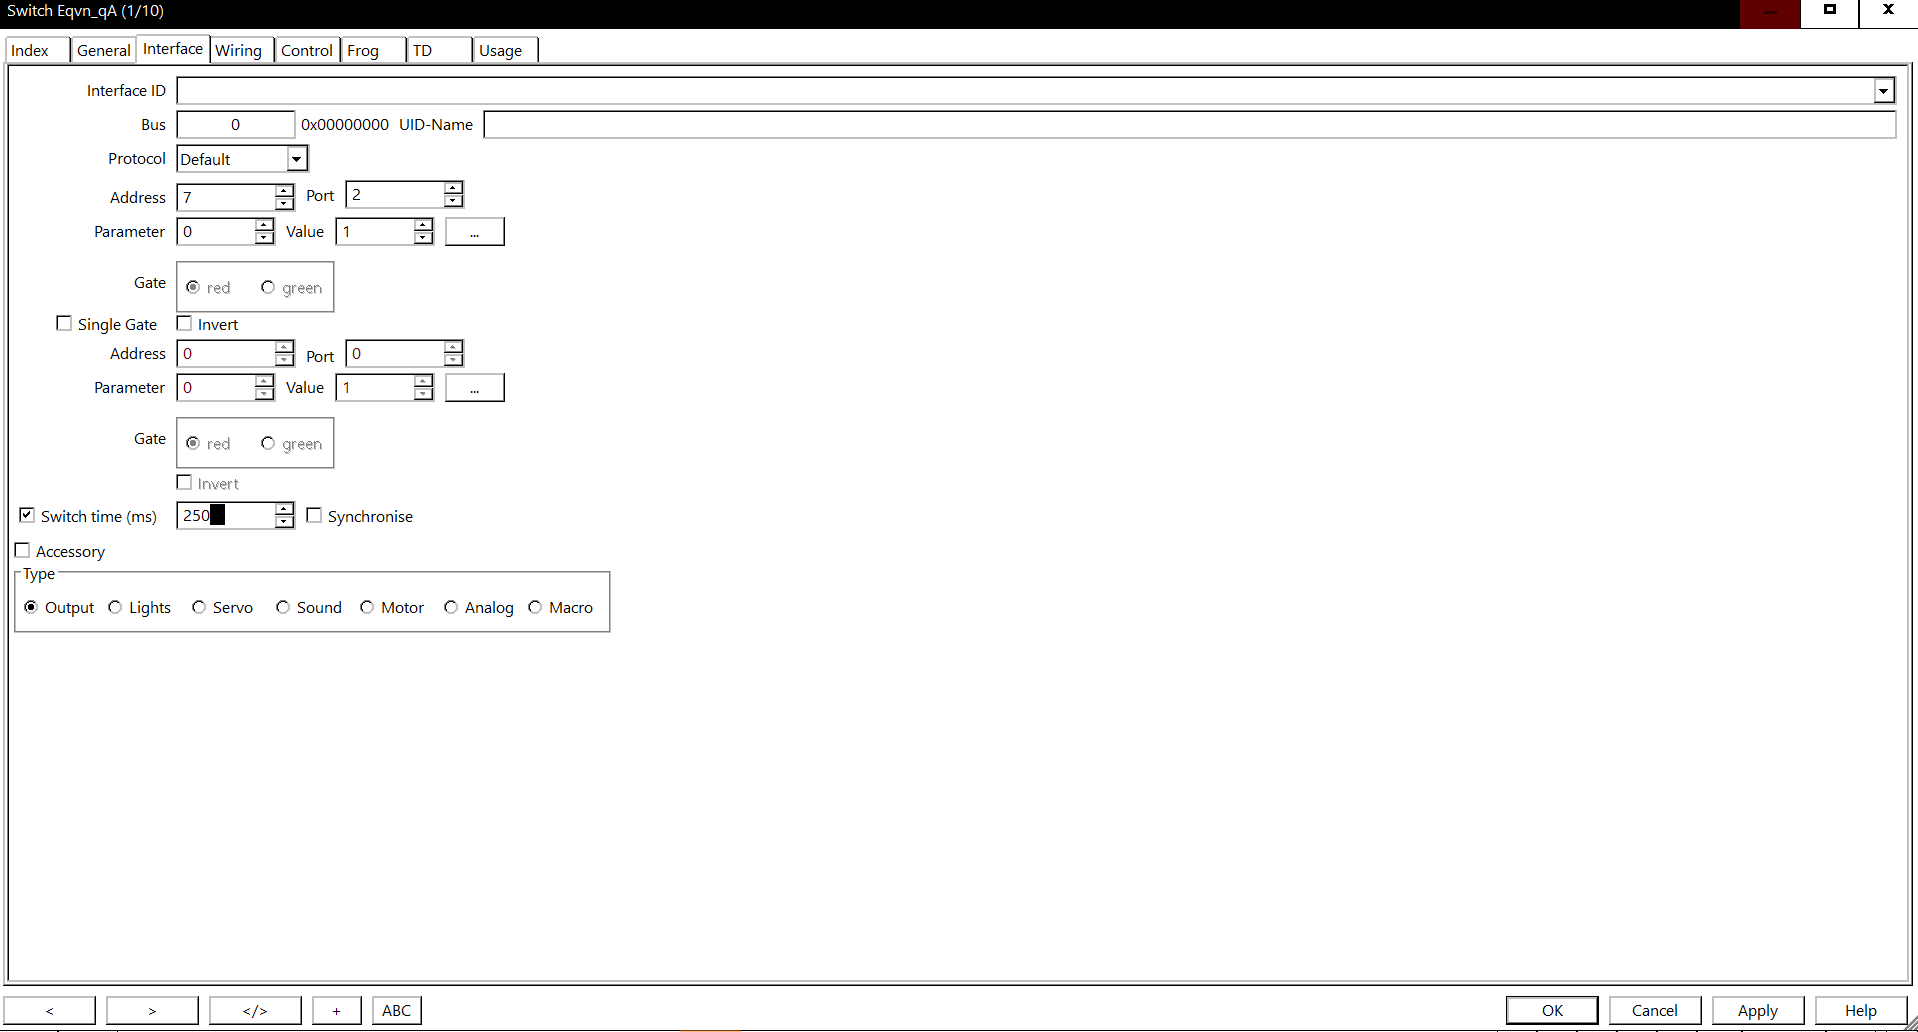
For a first test a new switch is created by either using the track plan editor or from the menu Tables → Switches. The connection between a switch and ECoS is carried out by the switch address. The ECoS is working with continuous addresses (see also Addressing) whereas in Rocrail typically a different addressing scheme (MADA) is used: Address stands for the decoder number and Port is the number of the decoder output. On a standard decoder the ports 1 to 4 are available. The field Address in Rocrail therefore does not directly relate to the ECoS address! However the ECoS also shows the MADA addressing scheme (Address = 7 and Port = 2 as an example in the picture below).
The following table can be used to determine the values to be entered into the address and port fields, respectively:
| ECoS Address | Rocrail Address | Rocrail Port | ECoS Address | Rocrail Address | Rocrail Port |
| 1 | 1 | 1 | 13 | 4 | 1 |
| 2 | 1 | 2 | 14 | 4 | 2 |
| 3 | 1 | 3 | 15 | 4 | 3 |
| 4 | 1 | 4 | 16 | 4 | 4 |
| 5 | 2 | 1 | 17 | 5 | 1 |
| 6 | 2 | 2 | 18 | 5 | 2 |
| 7 | 2 | 3 | 19 | 5 | 3 |
| 8 | 2 | 4 | 20 | 5 | 4 |
| 9 | 3 | 1 | 21 | 6 | 1 |
| 10 | 3 | 2 | 22 | 6 | 2 |
| 11 | 3 | 3 | 23 | 6 | 3 |
| 12 | 3 | 4 | 24 | 6 | 4 |
The values for other ECoS addresses can be calculated:
- Address = (ECoS-Address -1) / 4 + 1
- Port = (ECoS-Address -1) mod 4 + 1
Tip: Google can calculate expressions like(26-1) / 4+1and(26-1) mod 4+1. The results are7.25(use only the integer7) and2respectively. This is an example for ECoS address 26.
The figure above shows how to enter these values for ECoS address 26 in the Rocrail dialogue:
Detector Extension Outputs
In the EcoS touch screen interface, you can define an accessory ( e.g. A two states light signal) with a DCC address. You then associate two outputs of the ECoS detector extension to this accessory to reflect its state (one for the red led, one for the green led). Then in Rocview, you also define a signal of the same kind as the one defined in the ECoS, and with the same DCC address.
S88 configuration
Note: The ground terminal of the first sensor module must be connected to the ground pole of the tracks.
Note: The ECoS differentiates between 8 and 16 port S88 modules. Currently Rocrail defaults to 16 ports, thus continuous addresses are not possible.
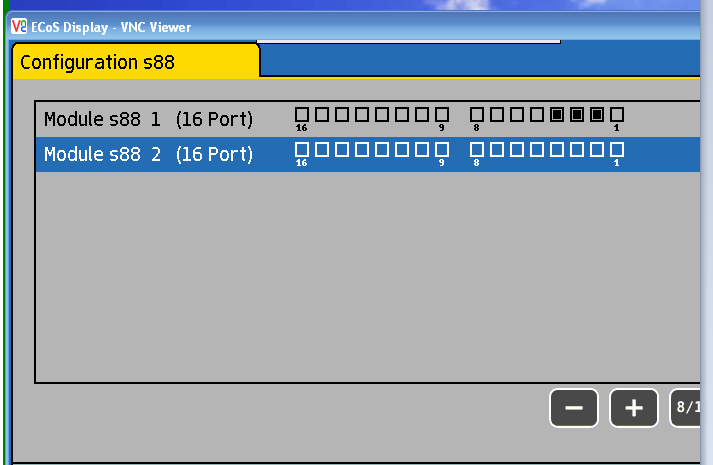
Add the S88 bus to your ECoS (screen shot from a ECoS II (version 4.0.2)), follow ECoS instructions – Section 22: S88 Bus configuration. You can see that two S88 modules have been added to the ECoS. S88-1: sensor 1 through 16 and S88-2: sensor 1 through 16.
You can see that 3 sensors (2, 3 and 4) of S88-1 show a status of occupied.
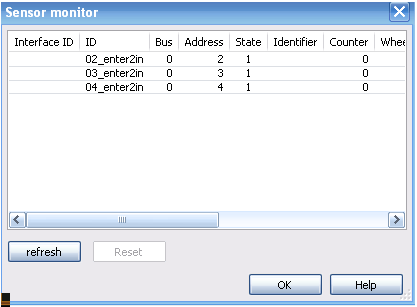
This is a picture of the Rocrail Sensor monitor. You can see that the same 3 sensors have a state = 1 (active).
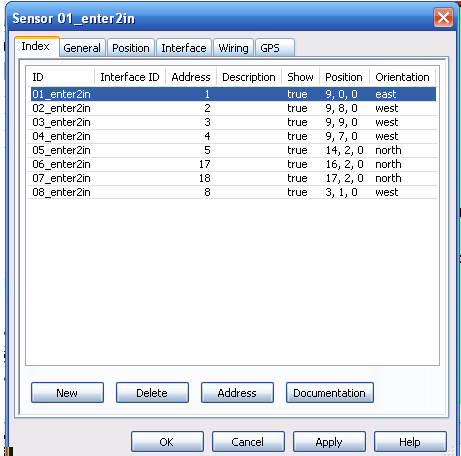
Here are the corresponding settings in Rocrail. The addressing in Rocrail differs from the addressing in ECoS. For S88-1 the Rocrail addresses are 1 through 16, for S88-2 the addressing starts with 17 through 32, S88-3 would use address 33 - 48, etc..
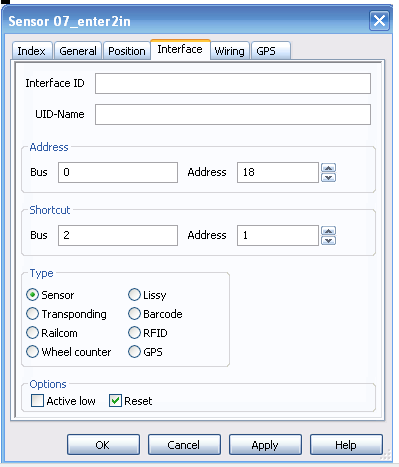
Note the address of 18 on the Rocrail Sensor Interface screen, for the 2nd sensor of S88-2. The "Interface Id" is blank as the default controller (here an ECoS) is used.
ECoS Detectors
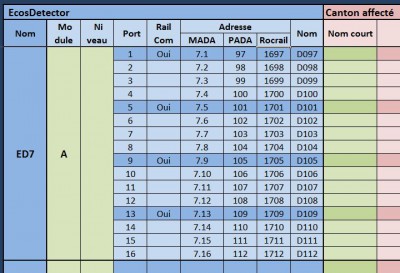
When using ESU Detectors the addresses are prefixed with 16, The first sensor has address 1601 and the last one in the string has address 1616. Once the 100th sensor (MADA 7.4, PADA 100) has been reached then the Rocrail addresses start with 1700, etc..
When installing a new sensor, the current status is not displayed but only updated after the status changes. To read the sensors Sensor Monitor.
RailCom Detectors

A work-around is to disable broadcasting addresses over RailCom channel 1 in all loco decoders. Also disabling RailComPlus is recommended.

Internal Booster
2.1.5891+
The internal booster with UID 65000 can be monitored in the Power Manger.
Shutdown
If needed Rocrail can send a shutdown command to the ECoS controller.
Check the "Shutdown on exit" box on the "Controller" screen of "Rocrail Properties".
Programming
Programming Track
ECoS Firmware: 4.1.0
Rocrail revision: 10285
Before using the programming track the rail power must be set to ON(GO).
POM Loco Decoders
ECoS Firmware: 4.2.3
Rocrail revision: 13974
Before using POM the rail power must be set to ON(GO).
POM Accessory Decoders
ECoS Firmware: 4.2.3
Rocrail revision: 13998
Before using POM the rail power must be set to ON(GO).
Protocol
ecos_pc_protocole.pdf —- First Edition - June 2007
ecos_pc_interface2.pdf — Second Edition - May 2010
ecos_pc_interface3.pdf — Third Edition - June 2011
ECoS PC Protocol Lizenz
Online help
telnet <ipaddress> 15471
help()<cr>

# Online help for the ECoSNet 0.5 implementation of your ECoS2 4.1.2
#
#
# About help:
#     help()
#         This help.
#     help(intro)
#         Introduction to the ECoSNet interface.
#     help(basic)
#         Basic ECoSNet protocol description.
#     help(syntax)
#         Description of the syntax of ECoSNet.
#     help(command)
#         Short explanations of the available commands.
#     help(error)
#         List of implemented errors.
#     help(<object>, [<command>, [<option>]])
#         Further help to a specific topic.
#
#
#     As a general advice, if something seems ambiguous, just give it a try.
#     Most things will be obvious afterward.
#
#
#     Please visit our website www.esu.eu
#     See also there for the licence condition of this specification
#
#
# Implemented objectclasses:
#     model
#     programmingtrack
#     loco-manager
#     accessory-manager
#     interface-manager
#     feedback-manager
#     booster-manager
#     accessorylayout-manager
#     locoimage-manager
#     loco
#     loco-multi
#     accessory
#     route
#     turntable
#     feedback-module
#     booster
#     wifi-interface


